They are made from real medium size goose eggs and are called Ice Fairy. I made 4 in blue, 1 in purple and 1 in yellow/gold.
I was only able to get the purple photographed and one picture of the yellow/gold before my camera battery died. I do not have time to wait for it to charge to make this post, so perhaps I will posts the blue later (which happens to be my favorite)
Why? Well, I have the next 2 weeks off of babysitting my grandson so am planning to go through my house top to bottom. It has not been done since my illness last year! Yikes, I think it will be quite the chore, but a wonderful way to start the new year. I know my husband will be thrilled, lol.
In this photo you can see the icy snow around the opening pretty well. You will not believe what is used for snow on eggs. It is bath & tub silicone! I would never have thought for a second that this could be used on egg art! It works so well and dries completely in 3 hours if the correct one is purchased. Of course, a ton of white glitter is added to the outside and inside of the snow.
This is the very first egg I cut the opening out myself. Such a simple opening, I thought it would be so easy. But it is much harder than I ever thought it would be. The shell is thin then thick which makes the dremel tool kind of bounce around. So glad that the edges are covered, lol

This is a fairly good picture of the inside details. Isn't the fairy so cute. She is made out of porcelain and hand made and painted. A dear friend sent these to me for her cost which was $10.00! And then she added all the do dads needed to complete the egg. My mother has quite a supply of the eggs, so the final cost for this was the fairy, a tube of silicone and some glitter.
The back trees are in three layers, one layer in front of the other, getting smaller at the layers get closer to the front. It is hard to see but it adds a really nice dimension to the scene.
This kind of shows the pretty chain bottom decoration as well as the Swarvoski crystal beads for the top hanger. The ribbon is not part of the egg, I just used it to hang it on the stand.
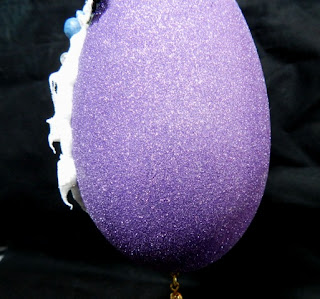
Oooooo...Look at that glitter. I used micro fine glitter from the Art Institute Glitter called Lavender. What is so good about the micro fine glitter is that it covers completely with one coat. One 1/4 oz container completely covered 4 of these eggs. Just imagine how long a 1/4 oz would last using it for paper crafting.
Here is the one picture of the yellow/gold egg. You can see how they are the same but different. It is hard to see the glitter that covers the egg in this photo, but am pretty sure you can see it better if you click on it to see it a bit enlarged.
Thank you so much for stopping by!!! HUGS, Sandy O





















No comments:
Post a Comment