Wednesday, December 29, 2010

It has been a long road

I know it has been quite a while since I have posted, not since mid October actually. I finally am able to make a quick post letting you all know that I am still around.

In Mid October, I woke up with what I thought was the flu. After 5 days, I was so sick and my back was in such extreme pain, which cause movement to be vertually impssible, that I was rushed to the hospital.

It ended up that I had endocarditis (a bacterial growth in a heart valve), a blood infection, acute renal failure and an absess in my lower spine.

After 6 weeks in the hospital, I was finally sent to rehab to regain my strength. It is amazing how much one will loose being sick and bed ridden for 7 weeks. I body/muscles had to learn to do everything all over again. I had even lost the ability to sit up for more that 10 minutes at a time, never mind walking.

I am finally home with physical therapy 3x a week helping me to regain my independance and am still on an antibiotic IV (sigh, my IV pump has become I constant companion).

The only other effect from the illnes seems to be that the middle finger on my left hand refuses to listen to my commands (of all fingers, lol) and sticks out when I try to do things. It tends to knock things over on me all the time, ha ha ha.

I am improving every day, in baby steps, but still require a walker. I am hoping to graduate to a cane in the next couple of weeks!

I miss my crafting so very much and am hoping to be able to get back to some of the simpler things soon.

I hope you all had a blessed Christmas and that you have a wonderful NEW YEAR!

Hugs,

Tuesday, October 19, 2010

Ekkkk...sewing on fabric

Just the other day I mentioned that I find it easier to sew paper than fabric. So...what do I decide to do? Sew on fabric, of course! Ekkkk...I thought, but I really wanted to make this project using Wink Wink Ink's new image "Bunny Blessing".


This is a scented mug coaster. I filled it with some dried orange peels and added a bit of ground Cinnamon and clove. Mmmmm...I love the scent of the finished project. Place a nice warm mug on top and you have a yummy smelling area to cozy up in.

Isn't the image adorable. I love the hat the snowman is wearing, tee he he. Lucky bunnies too. I do hope the snowman can still smell the delicious scent of the coaster {wink} The boarder is also part of the set.

To print the image I used Jacouard Ink Jet Cotton Percale Fabric Sheets.  What is great about these sheets is that they are backed with paper so go through the printer perfectly. The images come out fantastic. They also say that the printed fabric can be machine washed.

I did not have to use lining to keep the spices inside. The cotton worked so well, not even a small amount of poofs when mixing the spices after sewing all 4 edges!


As you can see, sewing on fabric is not my best technique, lol. I think this came out OK for my first coaster, but I am hoping another will come out better. This one I will keep for personal use, ha ha ha. I wish I had some pinking shears so the edges would not fray so badly. Perhaps I will be able to borrow a pair for next time.

I think these will make a wonderful, unique and cute Christmas gift along with some mugs and home made hot cocoa mix.

Another idea is to fill the coaster with dried pine needles. If you don't have any for this year, try saving some from this years tree for next year. I have done this before and the pine scent does not diminish! I simple ran my fingers down the branches before recycling it. The needles come right off (make sure to put something, like a plastic sheet or garbage bag, to catch the needles on, ha ha ha, ask me how I know this!) I saved them in a zip lock baggie and they were perfect the next year.  A fun image for this would be the Wink Wink Ink "Holiday Peace" set.

I hope you like the idea. I am on the search for plain white mugs which I can add this image to after making it into rub-ons.  (a quick tutorial for this is HERE)

I am entering this post in this weeks Tip Top Tuesday (anything goes).
HUGS,

Monday, October 18, 2010

Finally, Just Because

WOW! I can't believe a whole week has gone by since I last posted. We caught a bug in the house and it zapped all my energy.  I did try to do some crafting one day and SHEESH! Did you ever have a day that you spent crafting and EVERYTHING went wrong? Spending the whole day to end up with nothing? That is the kind of day I had, so decided to just wait until I was feeling better.

During that week, I went through my blog and realized it had been a while since I made a card just because. I love the design teams but sometimes playing for the sake of playing is such a stress reliever. Saturday I was feeling better and was very excited to get into my craft room. Making a card just because seemed a great way to get back into the swing of things (yeah!)


I found a wonderful site "Digital Designs by Elisa". She creates brushes, which I use in photo shop elements, but found they can be used as just a digital images. I have collected so many of her sets (they are free but she has a donation button to which I send a small donation every now and then). Oh my, they are stunning! Every single set just blows me away.

The image I used for this card is from the "Garden Tea and Floral" pack. I chose it for it's beauty and simplicity. I am so excited that I was finally able to spend some time using one of her images!!! I must admit that I have a lot to learn about using brushes. As of right now, I only know how to change the color of either whole or partial part of the image. They are fun to play with and will be learning more as time allows.


I colored this image with my copic markers as well as a paintbrush to add chalk for the color around the image. I am running out of my beloved prima roses (one of my next orders, lol), so had to color some to match the image and paper using the copics I colored the image with.  Oh Ohhh, I just realized I did not shadow around the flower itself! Oh well, lol Seems there is always something I could have done different.


Here is the inside of the card. I love the new nesties I got. I am hoping AC Moore will be carrying the new sets when I finally have a chance to go. This set I actually purchased on line since I just couldn't wait, tee he he.

Well, I hope you have a wonderful and healthy week!!!

Hugs,

Tuesday, October 12, 2010

Poinsetta, Stitching and a Quick Tip

STITCHING! Are you like me and hate sewing? I learned how to years ago and have disliked it (to put it mildly) once I learned how. When I heard of stitching on paper, my first thought was "uggggg", but I gave it a try anyway. I loved it instantly. Sewing/stitching on paper is so much more fun and much easier than sewing fabric, plus you get almost instant gratification (yeah!)


This week the Digital Tuesday Challenge is stitching, faux or real. If you have not tried it, now is a fantastic time.


The sponsor this week is Designed 2 Delight. The winner will receive a $10.00 GC toward any images in the store!


The design team was lucky enough to be able to choose any image from the store to play with. I chose the lovely image called Hand Picked.


I used both real and faux stitching on my card. For the real stitching around the frame I used metallic embroidery floss. I also used the floss to stitch on the gold beads in the center of the Poinsetta. I used my Prisma gold marker for the faux stitching, to color the boarder and on the flower.


I did not have any gold pearls, so I used my Prisma gold pen to color the pearls before adding them. I did let them dry, but they still dulled on the top when pressing them onto the paper with my fingers.

My TIP is that when using metallic pens to color pearls or even brads, to reapply it to the tops after adhereing to restore the gold/silver luster.

The base of the card is actually gold gloss cardstock. The camera did not pick up the shine of the gloss, though. I purchased this particular paper from Papter Temptress. Three things I love about this paper are that it really has a beautiful gloss/shimmery look, it is a light gold I have not found anywhere else and it is white on opposing side which makes it perfect for using as a card base.

I am entering this post (tip) into this weeks TIP TOP TUESDAY CHALLENGE.

Have a super Tuesday. There are not to many nice days left before the winter is upon us, so I hope you are able to take advantage of them!

Hugs,

Monday, October 11, 2010

Medallions and Pearls

Hmmm...I am not sure what to write today, lol. Anyone else ever run into that problem? I guess that means my post will be short, ha ha ha
I joined a wonderful Teabag Folding group on Yahoo. Someone posted the directions for this fold and I just had to try it.
All the paper I used is from Paper Temptress. I printed the fold on my favorite paper of all time, white diamond.
The white diamond is a bit thick for teabag folding so I had a bit of a hard time with the first few folds. I think next time I will print out some on computer paper, lol. It certainly won't be a pretty but will be much easier to fold.
Can you see the wonderful shimmer of the paper? The card is so pretty in real life. The ribbon and pearls are actually left over from making my daughters wedding invitations 3 years ago! I have all the scraps and left overs in a bin hiding in one of my cabinets. So glad I remembered it for this card as they matched perfectly.
I used more left over ribbon on the inside instead of pearls. the pearls really would have made the card impossible to close, lol

Well, off to make my card for tomorrows Digital Tuesday Challenge. Before I can do that, though, I need to get rid of the clutter in my craft room, tee he he. I have had so much fun playing that I neglected to put everything way. SIGH...so much paper to put back in their files...someday I will learn to file them as I cut, Bwaaa ha ha ha!!!

I am entering this card in the following challenges (I hope a stamp is not required!)
Cowgirls Sunday Challenge: Girly Girl
Crafty Card Makers: Fancy Folds
Theres Magic in the Air: Frame it out

Have a super Monday everyone.

Hugs,

Sunday, October 10, 2010

New blog Candy Winner

Hi Everyone...the blog candy winner has not gotten back to me after 9 days so I decided to draw another winner.

True Random Number Generator
Min: 1
Max: 94
Result:
32
Powered by RANDOM.ORG

I wish I knew how to copy the box, when copying and pasting, this is all I get...but

Genelle Voss is the lucky winner. Genelle, email me with your information and I will get you candy out this week.

paulssandy@papertransformer.com

Congratualations!

hugs, Sandy O

Saturday, October 9, 2010

Inchies Perfect Flowers

Finding items for making a pretty inchie can be difficult, especially flowers. I have taken up making tiny, tiny, itty, bitty flowers, mostly for egg making. These tiny flowers, though, are the perfect embellishment for an inchie.


As you can see by the dime next to them, they are TINY. These are the first dogwoods I have made. I also made some lily of the valley, which you can see on my blog post here.

These flowers are made from paper that has been punched out with punches made specially for creating flowers this size. To adhere them to the stem, 2 glues are used. First, holding the petal or leaf with tweezers, the tip is inserted in some tacky glue. Right after, it is inserted in some super glue and quickly attached to the stem. The super glue causes them to adhere instantly. I am really not sure why only super glue is used, lol, but they are always made with the 2 glues.


Aren't they cute! I made 11 so far and have a few more to make. I will be making many of these, as well as many others between now and next October. The plan is to get a table at next years Egg Art Show and sell them to those attending the show.


I could not help but notice that they would make a lovely inchie. I decided to use an old pre-cut chip board square and cover it with some of the lovely and shimmery Paper Temptress paper.

Now, I will confess to you that this is not a true inchie since it measures 1 1/4" square instead of 1" square. I did not have a pre-cut 1" to use, so thought this would be close enough, lol.

I had such a difficult time tying this knot! Four leaves ended up falling off and I had to reglue one petal. Other than that, this inchie was super fast to make.

I am sure that you could purchase some small punches at your local craft store to make some of your own.


I am entering this into the following challenges:
Cute Card Thursday: Make your won embellishment
For Fun: Something you never used before
No Time To Stamp: Back to nature, any season
Stamp Something: Something punchy. use a punch
Tuesday Throwdown: Chipboard

Have a super weekend!!!

Hugs,

Friday, October 8, 2010

Celebrate Everything Everyday

There are so many things to celebrate today, such as health, family and a wonderful life in general. Among these many blessings, there is one other thing to celebrate today. Wink Wink Ink is hosting the "Other Things" challenge over at CDAC (Crafters Digital Art Center). The link HERE will take you directly to the challenge.

The challenge is:
Let's have some yummy fun!! Use food themed images, embellish with your favorite eye candy, do whatever it takes to make your card a feast for the eyes!!

The challenge is going on until October 20th.

The winner will receive a Free digi from WWI. You can check them out here. The are sooooo adorable!


Not only is this a scrumptious challenge, but Melanie is offering a freebie "set" for you to use if you desire. There are 5 freebie images you can download  from any of the challenges WWI has hosted on CDAC which you can find in the discussion center here.  This particular set can be found here along with the challenge. One of these 5 sets must be used for the challenge.

To download the set, all you need to do is click on it...when the new window opens, just right click...save as and save in your Wink Wink Ink file. If you do not have a file full of WWI images yet, now is a great time to start a folder to fill {{{wink}}}

I used the set to make a delicious card that can be used for many occasions, because every day offers something to celebrate!


For this card I used 4 images from the set...cupcake, rose, candle, sentiment stick (not sure what the real name of it is, lol}. A tent card seemed to be perfect for the images :o)


I will be watching the challenge as I am excited to see what creations are made with this or the other adorable images that WWI is offering for free!

Enjoy! And don't forget that everyday has something to celebrate (with a cupcake, of course, lol!!!)

Hugs,

Tuesday, October 5, 2010

One Set, One Design, 3 Ways and a Tip for you

Wink Wink Ink posted their monthly challenge (this is challenge #4) on CDAC (Crafters Digital Art Center) last Monday. The challenge: BUTTONS. You are to use any kind or size button you would like, as long as there is at least one on your project. How nice and simple is that!


>>>The winner will receive a $10.00 Gift Certificate to the Wink Wink Ink store!!!<<<

Today I want to share with you WWI's brand new set Holiday Peace. I used the same stamp set and the same design for each of 3 cards. I was pleasantly surprised how different the look of the digital image and completed card was by changing/adding just a couple of things. The 3rd one below is the card I made for Challenge #4.

CARD 1
For the first card I simply printed out the pre-colored card front. I searched high and low for matching pattern paper and could not find one! YIKES!! So I did what any good crafter would do, I searched through our Christmas wrapping paper and found a perfect match!

I covered the complete card front with the wrapping paper. I ran my Krylon gold marker around the edges of each layer, adhered with dimensionals and finished off with a bow.

For the inside, using Photo Shop Elements, I changed the opacity of the cat/mouse silhouette to around 20%. I also changed the color of the sentiment using the paint bucket tool. Again running the Krylon marker over the edges and adhered.
CARD 2
For the second card, I wanted it to be just as quick and easy but with a pretty shimmer. I used the Paper Temptress Canvas Luster paper to print the image onto, some colored Vintage Luster paper for layers and White Diamond paper for a base.
 I love how the different paper caused the colors to be muted a bit, printing out is soft pastels.

CARD 3:
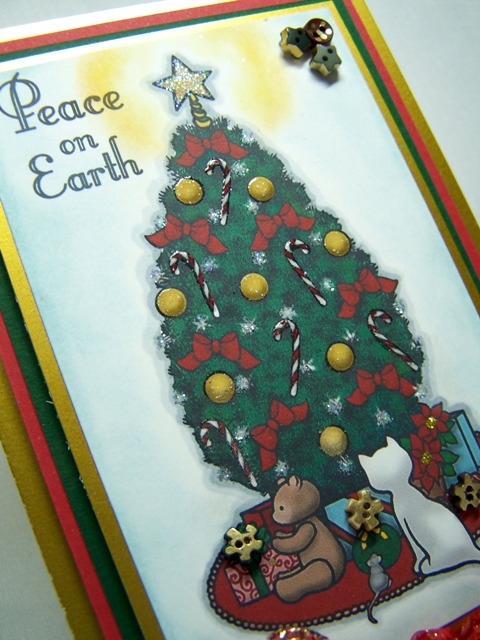
For the 3rds card, I deleted the background color of the card front image, leaving it white but the image intact.

TIP:  Try using a firm, flat paint brush to apply your chalks. The one I used for this background is 1/4". What I found is that a paint brush as opposed to other mediums I have tried, such as sponges, daubers and cotton balls:
1. Gives much better control in how light or dark the color is applied
2. Does not apply splotchy but keeps the colors even
3. Gives much better control of where the color is applied. The light around the tree topper is a good example.
4. Gives a much better blending of colors. You can see how the background gets darker as it gets closer to the edges and below the tree, yet there is a nice, gradual blend.
5. Best of all, the paint brush cleans off with just a wipe or 2 on paper and can be used indefinitely, saving money!

I then embossed the candy canes and ornaments with clear powder and added glitter to the tree lights and topper. To finish it off I added some tiny buttons, which I colored with the Krylon marker, to the corner and gift bows. Below you can see that I also added some star buttons, with the back loop cut off, to the inside of the card.

Here you can see the 3 card fronts:


Isn't it amazing the difference a few small changes make!

I am entering this into the following challenge:
Top Tip Tuesday Challenge #5

I can hardly wait to see all your "button" creations through out the month...have fun with it!

Hugs,

Fun, Fun, Fun Challenge Today

This week Digital Tuesday Challenge has one of the challenges I love to do, Ribbons, Buttons and/or Bling!


We also have the most wonderful sponcer for you this week. Fred She Said is offer the winner a $20.00 Gift Certificate to her store!!! Whoo Hoo...

We were lucky enough to be able to play with an image of our choice. I chose to use the "Sunflower & Thankfulness Pre-Colored" Images.

With the set you get all the layers needed to make a dimensional card. Just cut, embellish and adhere.

For the center of the sunflower I used Tim Holtz distressing embossing powder. It is hard to tell by the photo, but it gives the perfect "bumpy" embossed look. To snaz up the flowers I added Dazzling Diamonds with my glue pen. I go through those pens so quickly as they can be used for just about anything one would need glue for.

Here is a close up of the scripture verse that comes with it. You can also add your own sentiment if you desire since there are 2, one with the scripture and one blank. I added Dazzling Diamonds around the frames also (bling, bling, I love bling, ha ha ha)

I used the blank one for the inside of the card, leaving it as a single layer with no glitter or embossing. The flower on the left is 2 layers.

For the card base I used the beautiful White Diamond paper from Paper Temptress. If you would like to see what makes this such a beautiful paper, the photo of the inside will give you a glimse of the shimmer it has (just click on the photo for a better look). Of course, a photo can never to justice to it as the shimmer reflects the light so wonderfully a good shot of it is really, really difficult to get.
This stunning ribbon is also from Paper Temptress. Patricia has all her ribbon on clearence for 40% off. I have been stocking up on most of it. I am not sure what I am going to do when I run out. It is the prettiest ribbon I have seen.

I am entering this card in the following challenges:
A Spoonful of Sugar: Sparkle and Shine
Fab'n Funky Challenge: Use a digi stamp
Ginger Loft: All that glitters or blings
Stamp, Scrap & Doodle: Open...but use a digi
Stampin' Sisters in Christ Challenge: Anything pertaining to nature
Stamptacular Sunday: Layer it on


Well, now my craft room is covered with embossing powder, glitter, tiny pieces of paper, a stack of paper that needs filing, a pile of print outs and templates needing filing, egg art stuff I bought that needs a place to rest....Soooooo, my plan today is to brush off my desk and work around it all, ha ha ha.

Have a wonderful day yourself. I really hope you join us this week at Digital Tuesday Challenge. I would love to see what you create with these super fun embellishments!

HUGS,