


Showing posts with label tips and tricks. Show all posts

Thursday, January 26, 2012

How To Loose Your Mojo In 4 Hours Or Less

WARNING: Picture heavy.

I am sure there are many recipes for this, but I came up with one all my own :o)

1. Pick your paper, a brand new die, basic embellishments and perfect image the day before. Make sure the die fits the size card. Spritz the flat non-shimmer paper with the Angel glitter spray so it shines like the other paper and let it dry over night.
2. Cute die shape. Making sure it comes out just about perfect the first time. (make sure to notice all the holes that DON"T need to be nudged out, this is important for the finale step) Realize that you cut it in the wrong color.
3. Cut the die with the correct paper. Work on this for 20 or so minutes because this time it will not cut well for some reason. Finally try a metal shim to help it along. This WILL work.

4. In the process of accomplishing step 3, you MUST warp both the metal shim and brand new die.

5. Attempt to attach die cut and realize that although it fits the bottom layer, it definitely will not fit on top of the other layers.

6. Find another new die and image that fits inside and with the paper.
7. Stamp image a MINIMUM of 3 times all of which are not correct. This step works perfectly when the first time the complete image does not stamp, the second image gets a black mark and the third time is to close to the edge of the paper to fit inside the die.

8. Decide that it is better to cut the die first and then add the image, cut the die, making sure it cuts perfectly in one try. Remove die and find out that ink got on the die when placing it on top of one of the previous images.
9. Cut out 2 more times after cleaning the die. Look at it on the pattern paper and decide to use an oval underneath to see the design better. You will NOT find an oval die that fits, so you must settle for the best you can find.
10. Start making the front of the card to encourage yourself. But do remember not to attach the image before coloring.
11. FINAL STEP: Decide it is best to clear off desk and put some items away before trying to color image. NOW is when you see why the die would not cut correctly the second time. All the tiny "holes" that popped out easily on the wrong color paper got stuck in the tiny holes of the die and you did not remove them before trying to cut again. Spend at least 30 minutes poking them out, which is very difficult because the paper is really stuck in the holes from forcing the 2nd cut to work.

***NOTE: It is very important to use a fine sewing needle for the last step so that you can make sure to poke your fingers several times as you try to force the paper out of the die.

Now if you followed these directions properly, your head is now spinning and your back is sore from bending over your die cutting machine to long. Soooo...you decide to do something that is absolutely fool proof and you have never messed up before: take a nap.

Today, the mailman is in the neighborhood much later than usual and all 3 of your dogs bark the whole time until the sound his jeep fades away (this will take exactly 22 minutes). At this point you finally doze off and the phone rings. It is your husband who called to say he is coming home early, which happens as often as Easter falls on a Monday. NOW, at this point, you have failed at your fool proof napping!

NEXT DAY (the good one): Slept well...get up at 4:30 with hubbie...daughter calls to say the grandson is sick, can you babysit for 11 hours today...tell her of course you can...grumble words you can't type into you blog on the way to the shower...have extra time so take photos of yesterday's accomplishments since it will be the only thing that can possibly be posted on your blog for the next couple of days...Now it's late...rush out the door...start to silently daydream about a 2 year old who is not sick to his stomach and naps all day...see flashing blue lights in your rear view mirror...speeding...licence and registration please...finally dig out registration and hand over your "I have to keep this photo hidden" licence...wait...he starts back to the car as you prepare your self for the dreaded word "ticket"...suddenly the words "just a warning hits your ears...YEAH!!! Thank you, thank you!!! IT IS GOING TO BE A GOOD DAY!
 
I hope you have a great day too!!!
HUGS, Sandy O

Thursday, December 8, 2011

3 Cards, 1 Image

Hi everyone! Today I want to show you the adorable Dolly Dingle 3D Image < (link directly to Dolly Dingle) from Nicecrane Designs. Such cutie pie image using the Campbell Soup type girl images.(remember them?)  I love Ignacios' images and paper as well as making 3D images, as you all know. Well, I just could not wait to use this wonderfully adorable Dolly Dingle.

I had so much fun with her, I ended up making 3 different cards. I am only going to show you the outside of the cards since I did not take the time yet to do the inside. I was enjoying her just to much!

On this card I think I may have added to many pearls (is that possible, lol) Believe it or not, I find putting on pearls and jewels quite relaxing now that I discovered the bottle and tip that makes tiny dots of glue. You can see what bottle I am talking about in my post HERE. The top layer just under the embellies is a patterned paper with some very pale pink swirls. I just could not get it to show up well, so the layer looks white.
For my first card, I used the image as the directions indicate. Isn't she just so cute.

This is the first time I have made the green twirls to use with the flowers. Ever since the first time I saw someone use them, I have been wanting to use them too. I had no idea how to make them or where to buy them though. I asked one blogger but she never got back to me. Finally, I found a blog where she told how to make them. I wish I could remember whose blog it was, but I don't and did not book mark it for some reason.
TIP: It is so simple, I felt silly for not thinking of it. You simply twist the stem of the flower on a small round tool, such as an embossing tool (which is what I used) I am not sure if others leave the stem on the flowers or not, but I cut mine off and then twisted them. This gives the ability to put them where ever you want.
Here you can see the layers on the image. They are big enough to make cutting them out easy. I used quite a thick card stock to print it out on, which left the edges showing white. I simply used my Copic C3 marker around all the edges before adhering them.
For this card, I printed the image out 2 times. Both of them fit on one sheet when I cropped off the directions. I made it as the directions indicated, then took it one step further. Using the second set of the image pieces, I cut them down even more. An example would be just the rim and flowers on the hat and just the toe part of the shoes. This made the image have 5 layers.

Once I was finished with this card, I still had one of the bottoms of the image left. I decided to use it for a "flat" card. Again, the paper is not showing the colors correctly. The plain paper is actually Old Olive from SU. I have no idea why it looks kind of grey. Hmmm...This new camera just may be to full of bells and whistles for me. I did finally figure out the "white" setting, but I guess getting the correct colors to show is another setting...sigh.

All 3 cards are so similar, making them was quite easy since the designing part was done with the first one. AND....WOW...MIRACLE OF MIRACLES...I found the perfect paper for all three in the first paper pack I picked up!!!

The dragonflies are from Penny Duncan who has a store on Etsy. She sells the finished dragonflies as well as some butterflies. She also has directions on how to make them if you prefer to do so. I prefer to purchase the finished ones, lol. The tutorial included free cut files so you don't even have to cut them out by hand. How great is that! What a sweet person she is. You can find the tutorial HERE. OK, not only that!!! She has loads of free cutting files for you to down load and enjoy. Check out her blog HERE.

Phew...This post is a bit longer than my usual posts, so if you stuck with me...THANK YOU :o) I hope you like the 3 ways to use this image.

Have a super duper week...HUGS...Sandy O

Friday, October 28, 2011

Tips and Tools

Oppps, lol, I meant to publish this tomorrow! I guess you get 2 long posts today {blush}

***Yesterday I mentioned that I tried the SU equivalent of the Stickles. As you can see below, the SU is pretty much the same color as the Star Dust Stickles.
I was a bit disappointed when the SU one arrived since I already have 4 bottles of the Stickles! Why??? I am not really sure since one bottle lasts a really long time, lol

To my suprise though, the SU one dries much faster!!! I added quite a bit of this glitter glue and it dried completely in less than an hour, WOW! This was WONDERFUL since I am a very impatient person and tend to smear the Stickles due to my refusal to wait long enough.

***Talking about glue, do you add a blob of glue to a paper and use a toothpick to adhere small items like pearls and gems? Well, here is the perfect solution.
 I LOVE these small glue bottles. They come in 3 different sizes with the metal tips having slightly larger hole in each size. You can fill with your favorite glue and finally enjoy adding those small pretty embellies to your project. These tips really make a tiny glue dot, perfect for non-adhesive pearls and gems. This is what I used for my ornament yesterday as well as adhering the thin cord.

You can find these from  The Golden Egg Of Idaho (they will only charge actual shipping and are super fast) or the Eggery Place. You can find some less expensive, but I would not recommend purchasing the tips seperate from the bottles or kits offered elswhere. These ones come with a pin that fits inside each metal tip. This is important because, not only do they fit perfectly...but, also are stainless steal. Stainless steal will not rust as the nickle plated pins do. I had the darndest time finding stainless steal pins and none that were small enough for these tips. Before adding the metal tip on the ones from The Golden Egg, make sure to cut the plastic tip down to the ring, leaving the ring in tact. The Eggery Place bottles should be cut much less. the tips click on the plastic bottles diffently.

***These are my all time favorite tweezers. I love the pointy tips each have. The smaller ones are just fabulous for thing like turning pearls and gems when they flip over. Being smaller, there is more control when using them. These can also be purchase from the Eggery Place.

***I have tried so many of those sticky type tools made specifically for picking up pearls. gems and beads. I did not like any of them. None seemed to work well for me, not even the wet spagetti trick. Then I found these at Pizzaz Aplenty.

They are called Gel Pickers and they are perfect. They are only .30 each! You can also purchase a package of the embellie gellie to make your own. I like buying the individual ones when I place an order since they last quite a while before dust gets on it causing the gel to not stick.

***Lastly, I have a couple of trick that I have learned and want to share with you.

To prevent cord from fraying you can give it a light coat of mod podge. Simply add a little to 2 of your finger tips and run the cord between them. Let it dry for a few minutes and you will not be able to tell. Any shine/glimmer from the cord will show through perfectly.

For my ornament yesterday, I only had white inridecent cord. I really wanted to use this kind for the egg, so I decided to try and color it with my copics (even after adding the mod podge) I ended up with colors that matched perfectly with the pearls and gems.


***Another thing I use mod podge for is to coat the paper around small holes. For the ornament yesterday, I gave 2 thin coats to the top and the cord is not going to rip the paper without a really hard pull.

WOW, what a long post, lol. I hope you were able to learn something new.

{{{HUGS}}} Sandy O

Thursday, May 26, 2011

Flower Soft: What I Have Learned So Far

Well, I spent yesterday playing with my new flower soft. I just received my flower pot kit and decided to "practice". I learned a few things I want to share with you in case you are wondering whether to purchase some or not.
  • When fluffing, do it very gently. If you press to hard, it will not fluff and will ball up.
  • The kits come with a white sponge to hold the wire flowers while they dry. It really doesn't work well. Green floral foam works much better.
  • Their glue gave me hand cramps trying to squeeze out. I switched to Clear Gel Tacky Glue by Aleene's and it worked fine. It did take longer to dry, but my hand was happy.
  • To add glue to card toppers, use a VERY small paint brush with a pointed tip. The smallest one I had was still a bit to big and it is really small!
  • Squeeze glue directly to wire when making flowers. I wish the wire came in green instead of white.
  • The FINE flower soft is perfect for the card toppers. The REGULAR is perfect for making flowers on the flower soft wire.
  • REALLY let it dry well, lol
  • You can burnish the flower soft on the cardtoppers gently, but not on the flowers made on wire
  • To make a bouquet, make the flower wrap first. Then measure the wire a bit longer than the wrap before making the flowers. It is easier to fit them in that way.
  • For card toppers, it is better to put the greenery on first, then the flowers. It is much messier and less pretty the other way around.
  • Don't rub the glue on with the brush, dab, even for the greenery. It gives a more realistic look.
  • White does not work well as a flower color for a card topper. I am not sure why their toppers have daisys on them but the white seems to get lost with the white paper. Even with the greenery. Maybe if there is some "fine" white it would work better but the regular white does not.
  • You don't have to use the same color flower soft as the flowers on the printed topper. The flower soft covers the print anyway.
  • It requires more practice than I thought. It is not as easy as the directions make it sound, lol. The flowers on the wire are easy to make though.
  • It gets everywhere! Kind of like glitter. At least it did for me.
  • I would never make my own with the styrofoam balls like some people do. To messy and would take up to much room to store. I also think it would be to chunky if I made it.


First toppers I made with white flowers. Here I made flowers first and then added greenery.
White flowers don't show up well.
Here is the one I added greenery first, then different colored flowers.
The next time I will make bigger spaces to make the flowers, I think the bigger flowers look prettier.
Flower bouquets. The one on the left is the first one I made. I had the darndest time making the paper tube thing. Certainly need more practice. I really think green wire would look much better. I did not make paper leaves yet which may cover up the wire, hopefully. They add some really thin ribbon in the kit which will be perfect for making a bow to add. I am not sure how I am going to use these since they are really small. Maybe make a tag with them and then add the tag to a card.
I hope this helps someone who may have the same questions I had about flower soft. It is definately addictive and I will definately be practicing using it.

Hugs,

Monday, April 18, 2011

Poor Mans' Nestie Storage

I have quite a few Nestabilies, though I tend to use the same ones over and over, that I needed an inexpenive way to store them. AND..., of course, did not want to spend my precious craft money to store items, lol.

I have not seen this else where, so I thought I would share it with you. I took these photos after I made my second one with all the new Nesties that I got recently. YEAAAY for tax and bonus time (big smile here)

What I did was purchase a zipper binder on sale at staples and some magnetic strip tape from Amazon. I find that the magnetic tape at the scrap store does not hold much of anything well. Amazon has much better tape at an inexpensive price. The one I purchased you can find HERE.

For each page, I taped together 2 sheets of Walmart card stock to make the pages sturdy enough to hold the weight. All I had to do was add 2 strips of tape per side. Each side hold 2 sets, that is 4 sets per page.

To prevent the pages from sticking together, I used some of the USPS flat rate envelopes I had hanging around. These are free at your local post office :o) Each envelope makes two pages.

There is even room for the Spellbinder embossing sheets, one of which I think I ruined putting it through my Big Shot wrong, but kept anyway just in case it will work "good enough" next time, lol.

This binder is already holding 14 sets of Nesties. As you can see, there is still loads of room for more! The first is home to 26 sets, but for this one I used corrugated packaging sheets (I think that is what they would be called) which are much thicker than the USPS envelopes. Next time I go to the post office, I just may pick up more and change them.

Each binder only cost between $20-$25 depending on what each zipper binder cost me.  That is so much less than the magnetic folders that they sell just for the nesties. They take up very little room too.

Well, I hope that gives someone an idea of how to store these. If you have a unique way of storing yours, I would love to hear it :o)

Have a super day, Hugs,

Tuesday, October 12, 2010

Poinsetta, Stitching and a Quick Tip

STITCHING! Are you like me and hate sewing? I learned how to years ago and have disliked it (to put it mildly) once I learned how. When I heard of stitching on paper, my first thought was "uggggg", but I gave it a try anyway. I loved it instantly. Sewing/stitching on paper is so much more fun and much easier than sewing fabric, plus you get almost instant gratification (yeah!)


This week the Digital Tuesday Challenge is stitching, faux or real. If you have not tried it, now is a fantastic time.


The sponsor this week is Designed 2 Delight. The winner will receive a $10.00 GC toward any images in the store!


The design team was lucky enough to be able to choose any image from the store to play with. I chose the lovely image called Hand Picked.


I used both real and faux stitching on my card. For the real stitching around the frame I used metallic embroidery floss. I also used the floss to stitch on the gold beads in the center of the Poinsetta. I used my Prisma gold marker for the faux stitching, to color the boarder and on the flower.


I did not have any gold pearls, so I used my Prisma gold pen to color the pearls before adding them. I did let them dry, but they still dulled on the top when pressing them onto the paper with my fingers.

My TIP is that when using metallic pens to color pearls or even brads, to reapply it to the tops after adhereing to restore the gold/silver luster.

The base of the card is actually gold gloss cardstock. The camera did not pick up the shine of the gloss, though. I purchased this particular paper from Papter Temptress. Three things I love about this paper are that it really has a beautiful gloss/shimmery look, it is a light gold I have not found anywhere else and it is white on opposing side which makes it perfect for using as a card base.

I am entering this post (tip) into this weeks TIP TOP TUESDAY CHALLENGE.

Have a super Tuesday. There are not to many nice days left before the winter is upon us, so I hope you are able to take advantage of them!

Hugs,

Tuesday, October 5, 2010

One Set, One Design, 3 Ways and a Tip for you

Wink Wink Ink posted their monthly challenge (this is challenge #4) on CDAC (Crafters Digital Art Center) last Monday. The challenge: BUTTONS. You are to use any kind or size button you would like, as long as there is at least one on your project. How nice and simple is that!


>>>The winner will receive a $10.00 Gift Certificate to the Wink Wink Ink store!!!<<<

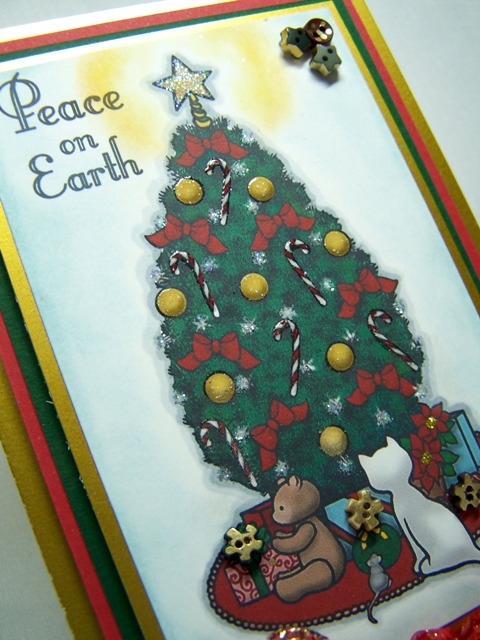
Today I want to share with you WWI's brand new set Holiday Peace. I used the same stamp set and the same design for each of 3 cards. I was pleasantly surprised how different the look of the digital image and completed card was by changing/adding just a couple of things. The 3rd one below is the card I made for Challenge #4.

CARD 1
For the first card I simply printed out the pre-colored card front. I searched high and low for matching pattern paper and could not find one! YIKES!! So I did what any good crafter would do, I searched through our Christmas wrapping paper and found a perfect match!

I covered the complete card front with the wrapping paper. I ran my Krylon gold marker around the edges of each layer, adhered with dimensionals and finished off with a bow.

For the inside, using Photo Shop Elements, I changed the opacity of the cat/mouse silhouette to around 20%. I also changed the color of the sentiment using the paint bucket tool. Again running the Krylon marker over the edges and adhered.
CARD 2
For the second card, I wanted it to be just as quick and easy but with a pretty shimmer. I used the Paper Temptress Canvas Luster paper to print the image onto, some colored Vintage Luster paper for layers and White Diamond paper for a base.
 I love how the different paper caused the colors to be muted a bit, printing out is soft pastels.

CARD 3:
For the 3rds card, I deleted the background color of the card front image, leaving it white but the image intact.

TIP:  Try using a firm, flat paint brush to apply your chalks. The one I used for this background is 1/4". What I found is that a paint brush as opposed to other mediums I have tried, such as sponges, daubers and cotton balls:
1. Gives much better control in how light or dark the color is applied
2. Does not apply splotchy but keeps the colors even
3. Gives much better control of where the color is applied. The light around the tree topper is a good example.
4. Gives a much better blending of colors. You can see how the background gets darker as it gets closer to the edges and below the tree, yet there is a nice, gradual blend.
5. Best of all, the paint brush cleans off with just a wipe or 2 on paper and can be used indefinitely, saving money!

I then embossed the candy canes and ornaments with clear powder and added glitter to the tree lights and topper. To finish it off I added some tiny buttons, which I colored with the Krylon marker, to the corner and gift bows. Below you can see that I also added some star buttons, with the back loop cut off, to the inside of the card.

Here you can see the 3 card fronts:


Isn't it amazing the difference a few small changes make!

I am entering this into the following challenge:
Top Tip Tuesday Challenge #5

I can hardly wait to see all your "button" creations through out the month...have fun with it!

Hugs,