Showing posts with label Iris folding. Show all posts

Monday, June 18, 2012

Using My Favorite Techiques

I have had a really hard time getting into my craft room due to baby sitting my grandson. My daughter just got a new job, so I not longer have to babysit. It is bitter sweet.

Hmmm...that is what I thought as I went to make my first project in a while. How exactly do I get back into it with the excitement I had before?

Deciding the best way was to do my favorite techniques, I pulled out my paper stitching and iris folding patterns. After a bit of trial and error, I finally found the perfect size iris fold pattern to go in a lovely stitching pattern I found in a magazine I have had for quite some time.
 

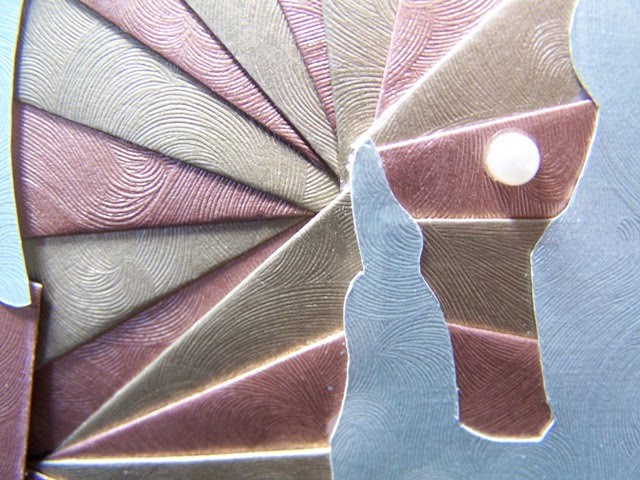
Isn't this iris fold pattern pretty! To really snazz it up I pulled out some metallic paper I have been hording. I wish I could remember where I purchased it. I am thinking that I will have to mark everything I buy with the store name so this will stop happening, lol

The metallic paper has such a lovely embossed design that really added some beautiful texture to the wings. 


Of course, I had to use some metallic floss for the stitching to match the paper. Even though the metallic floss is much more difficult to work with, the finished result is always worth it.

One problem I have always had when paper stitching is the pierced holes being quite large when I am finished. I find rubbing over them with a paper scorer works really great for remeding this.
  

I used a sentiment stamp from a Stampin' Up set called Wonderful Words. I love the font on this and am not sure I will ever tire of it.

To keep the continuity of the metallic look, I embosssed it gold.

Can you see the lovely shimmer of my favorite paper? Yum...The designer paper also has metallic outlines around the swirls. All of the designer paper I used for this card came from the lovely 6 1/2 sq." pad from Keiser Craft called Sweet Nothings.


There is a lot of texture and demension to this card. I added the pearls for a final touch. They are not as shiney as I would have liked, but the color goes quite well. I used some pale pink chalk to add a bit of shadowding around the butterfly here on the front. It did not show up in the photos, but in this one, you can tell the vanilla paper is not so vanillary. 


I used the butterfly that I cut out to make the iris fold for the inside top flap. WOW...was adding the piercing from the sewing pattern difficult. I just could not get the bottom flourished to match as well as I would have liked. After 3 tries, I just used the best one. Yeah...I agree, I am a bit anal about things like that, ha ha ha

To outline this butterfly as well as the one on the front and the anteneas, I used my Krylon gold leaf marker.


Here is the inside of the card. I used the stitching pattern as a frame, but only pierced it. I am not sure which I like better, just piercing or the sewing. It was the perfect way to dress up the rather large rectangle for a personal note.


Put all together, I am really pleased with how the card turned out. It is larger than most cards I make, being about 5 1/2 x 7". I did make sure I had an envelope to mail it in before making it. It would be a total bummer if I had a card and no envelope to go with it!!!

Now I am excited to get back to paper crafting and blogging again. Not only that...but the blog hopping I so much miss. I learn so much from other craftes. There are sooooo many wonderfully talented people out there!!!

{{{HUGS}}}

Saturday, April 23, 2011

Some Iris Folding

I made this card a few weeks ago and haven't had time to post it yet. I made the iris fold using shimmer paper from Paper Temptress. What I like about her paper is that you can get it in text and card stock weight. Here I used the text weight for the iris fold and the card stock weight for the base.

I was trying to make it look like a stained glass window. When I cut the corners, though, they did not come out uniform. I need to practice getting my slanted cuts more even, lol. The 'window" is adhered using dimentionals.

The ribbon on the edges is also from Paper Temptress. She was clearing out her ribbon from an older ribbon supplier which was giving her some trouble. I stocked up quite a bit on it and am happy I did since it is all gone. She does have new ribbon though, from a different supplier.

The flowers are from the wedding section of my local big box craft store. To dress it up a bit all I used were some of the gold outline stickers.

Have a wonderful and blessed Easter!

Hugs,

Friday, September 3, 2010

Iris Folded Long Haired Dauschund

One of my three pups is a long haired dauschund. I absolutely love his personality and his beautiful fur. He does not like to keep still and his goal in life is to "seek and destroy" much to the dismay of the critters living around the yard! Except for one kind, which was his last hunting trip. Peppy Le Pew did not give in as easily as the others do, YIKES!!! Right in the face, a direct shot! I wish I had a photo of him to share with you, but he just does not keep still long enough, lol. He kind of looks like this:


I purchased this fantastic pattern from Sylvia Griffin's site called "Iris Folding for a Cause". All the proceeds go to her granddaughter, Aileena, who has downs syndrome. You can read all about it on her site. If you are new to iris folding, like I am, (or not) I would highly recommend her site.


For the iris folding I used the Ruche Paper from Paper Temptress. It is a rather thick paper which is generally not recommended for iris folding. I really wanted to use it though, because the texture would give a bit of a "fur" look it. To attach the image to the card, I needed to used a double layer of dimensionals since the back ended up so thick. I colored him a bit with a copic marker to give him the darker fur where my doxie has it.

For the inside, I used the part of the pattern that was cut out. Is that the positive or the negative? I can't remember right now, LOL If you click on the photo you will be able to get a good look at the Ruche paper since I used it for the layer under the positive/negative piece.

The embellishments (corners and outlines) are metallic outline stickers. These are so pretty and are perfect for when you don't have a stamp image you like with your project.

Challenges I am entering this card in:
Corrosive Challenge: for the guys
Just Scraps: fussy cuts
Paper Playtime: Old McDonald's Farm which is open to interpretation. (I always think my doxie would be happier on a farm since he loves to chases other animals)
A Crafty Little Place: anything goes
C.R.A.F.T: dogs
Paper Take Weekly: use only 1 of something (I used one iris fold image)

I hope you get a chance to stop in tomorrow, I have some fun information to share with you, {wink} Hope to see you then!
{{{HUGS}}

Monday, May 17, 2010

Iris Folding Sealife

I once wrote in a post that the seahorse was the best husband and daddy on earth. Why? Well, the wife deposits the eggs into his pouch were he fertilizes and cares for them until the babies are ready to live outside on their own! I mean, WOW...why only the seahorse! {{{green with jealousy, LOL}}}

I find this sea creature fascinating because they are so different from any other I have seen. I also find them quite beautiful in their form, though their natural color is tan/brown. They do, however change to bright colors when they emerge from the safety of the sea grass and coral reefs.

I found a lovely seahorse iris folding pattern on line, here, and just had to get it. This past weekend I was able to take time to try it out.

Isn't he lovely. I used Vintage Luster  paper from the Paper Temptress. The brown and copper colors I had left over from making my daughters wedding invitations. That was 3 years ago and I have not found this paper since, until I happened upon the Paper Temptress.

See the lovely swirls, how perfect for the swirl of water! The embossed paper is actually a scrap I had from a mistaken measurement. I used to toss these mistakes, SHOCK, I know!!! One day I realized that some time in the future I will need that exact embossed pattern in that exact size. Well, this was the card.

I added some real sand dollars and a tiny star fish I purchased at my local scrap book store quite a while ago. These were VERY hard to use, lol. This image seemed worth the sacrifice. The tiny bottle I purchased at the same time.

I did not have any clean sand to put in it. Being in NE, there is plenty of sand to be had, but it is "dirty" sand, not the kind you would add to a sandbox. Sooooo...I thought for a minute wondering what I could use that would look like sand. I found the perfect thing...MAPLE SUGAR. Yum, this stuff is so YUMMY, LOL and expensive. Another sacrifice for this card even though it is probably only 1/8th a teaspoon, ha ha ha

I used the cut out from the iris fold patter for the inside. The inside embossed paper is yet another scrap from the same day. What a rough day that was, LOL. One of those days that nothing you try goes right. Perfect for this though, so now it seems worth it.
 I will be entering this card in the following challenges:

Pixie Dust Studio: cut it out
Shelly's Images: anything goes
For Fun Challenges: Use actualy stamp, NO DIGIS (My Sentiment)

I have added more blog candy for having 25+ followers, which you can see in the post at the top of the front page. Looks to be one big candy to win. And only 1 more follower for more. Soon I will have to add another blog candy, at least I hope so, LOL So, if you like my blog please sign up as a follower. {{{big smile and a wink}}}

Have a wonderful Monday...Hugs

Tuesday, March 2, 2010

Iris Folding With Ribbon and Paper Pricking

My wonderful boys (men really) bought me an iPod for Christmas. I had been wanting one, but once I had it what was I to do with it? My son Peter showed me how to get the music onto it by adding one of my favorite Cd's. Certainly looked easy enough!

Finally, yesterday I listened to it with the tiny little earphones. My Gosh, how do they get music to sound so good with these itty bitty things? Not only that, I could still hear what was going on around the house!

Of course, this morning I had to add all of my CD's but I was missing some. Did you know you can buy songs and download them right onto the iPod. Then...you can burn it onto a CD for safe keeping. This, I must add, is VERY dangerous, LOL. I now have loads of songs on this cute little device and will no longer be crafting in silence.

Why do I bring this up? Well...Yesterday while I listened to it for the first time, I finished a card I started a while ago.  Two things I have been putting off crossed off my inner list in one day, YEAH!

I tried Iris Folding for the first time a couple of weeks ago using paper I printed from Fred She Said digital paper. You can see it in my post here. Iris Folding certainly is very pretty, even with digital paper, but I could not help but wonder what it would look like with shiny ribbon!

Ribbon Iris Fold Outside
Now, can it be called Iris Folding when there is not folding, LOL, even though the iris is still there? It certainly did come out pretty and shiny. The ribbon is from Papertrey Ink, which I believe is the best, prettiest and most affordable ribbon on line. I did not have 4 colors of the polka dot ribbon so decided the white would work fine. What do you think?

What took so long for me to make the actual card after doing the Iris Folding is that I did not know what to do with the wide white boarded. It looked to plain even though I used the very pretty and shimmery White Diamond paper from the Paper Temptress.

Took me a few days, but it finally occurred to me to partner 2 of the new techniques I has recently learned, Iris Folding and Paper Pricking. This paper pricking pattern is from Angels Landing.

Ribbon Iris Fold inside Here is the inside of the card where I wanted to bring the paper pricking for continuity.  I was able to use the exact same template. To finish it up I added the flower to the bottom.

I would love to know what you think of this partnership!

Hugs, Sandy O

Comments from before moving to Blogger I really love it!! So elegant looking! Posted by: Jeannie | March 02, 2010 at 02:18 PM

Saturday, February 20, 2010

Iris Fold

I love the look of Iris Folding and finally decided to try my hand at it. Here is my first attempt.
FSS Iris fold
The paper I chose to use is digital paper from Fred She Said called Tie Dyed Cherry Blossoms. I printed out 5 colors, which the pattern idicated I needed.
The flower in the center is one of the cherry blossoms that you can purchase as either pre-colored or black and white.
FSS Iris fold CUThe iris folding is really quite easy and fast. It is the preperation that takes the longest.
U-tube videos with instructions, each with their own tips and tricks:
How to do Iris Folding
Iris Folding Heart
Iris Folding 101
How to do Iris Folding
Sites with free patterns
Simplicity of Iris Folding: simple basic geometric shapes, a few more complicated shapes and some downloadable paper to print
Handcrafted Greeting: Instructions, free patterns under the "patterns & instructions" link
Iris Folding Patterns
Craft.brod.org.uk:  Instuctions, free templates, directions to make your own templates
Clip Arts and Crafts:  Interesting background pattern for your iris fold circle
Patterns to purchase
Simplicity of Iris Folding:  books
Creative Papercrafts:  brass templates which include the paper folding diagram and complete instructions
Iris Folding Patterns:  patterns on CD. Has a link to reverse iris folding on the bottom of the page. Really neat!
Tea-tastic:  click on "place order" in right side bar to purchase
Dandee Images:  pre-cut white cards (not sure if the paper folding pattern comes with them) Pattern books lower on page.
I plan on practing this technique often. I hope you do too.
Hugs, Sandy O
Comments from before moving to blogger This is gorgeous Sandy. Something I haven't tried yet either. You did a fantastic job!! Posted by: Ellie | February 22, 2010 at 05:35 PM