


Showing posts with label Rubber Stamps. Show all posts

Friday, February 3, 2012

The Card That Scard Me


THANK YOU to everyone who gave me some tips on working with detailed dies! I definitely with try them next time.

OH boy, did I put off finishing this card! I spent a lot of time on Facebook wasting my time doing so, lol

Why? Well I guess you have to read my last post to understand most of why. The other reason is because I have not used my Copics in months. I have been cheating by using "pre-colored" images, or at least it feels like cheating. (Is there supposed to be a dash in the word pre-colored? LOL)

I would not make another project until I finished this one because I knew I would never get back to it, therefore it sat on my desk taunting me!

I guess I missed blogging too, because I talk a lot in this post, tee he he...

First I want to show you the pretty paper I chose. Miraculously the pattern paper was in the very first pad I looked at! Here you can see how the paper was pre-glittered. I really wish I did not have to re-size the pictures so small, it is so hard to see the details. You can click on the pictures to get a nice look at them though.
For the base layer, the only paper I could find to match the color of the pattern was Stampin' Up paper. I don't use SU paper often because it is what I call flat looking. There is no shimmer to match the other paper I like to use. My remedy was to spritz it with some of the Tattered Angel Glimmer Mist in Gold. This works so well to add just the right amount of shine, when I don't spray to much.
Adding the embellishments and making the inside gave me a bit of confidence.

The problem I have with my favorite ribbon, organdy, is when I make the tales like this. (Are they called "tails? I really need your help with names and dashes, lol) See how the glue dot shows through the ribbon? Does anyone know how to prevent this? What do you all use to adhere ribbon this way?

Now was time to color the image. I used some of my favorite paper, White Gold. This is very shimmery and a bit difficult to color (hmmmmm...silly paper to use as I jump into coloring again!)

The great thing about the messed up images that I showed you in the previous post came in quite handy. The white gold paper causes the colors of the Copics to look different than they really are. I was able to get the colors to look the way I wanted by practicing on these extra images. So I guess it was a good thing I messed them up!
This paper is difficult because the paper does not absorb the ink well at all, making blending very difficult.

I did not have the colors I needed so I used the tip to tip technique (I think that is what it is called) to make the lighter color a bit darker. It worked quite well and blending the 2 colors this way worked perfectly. Adding the darker color for shading was a bit more difficult. The lighter color just pushed the darker color to the edges.

What I finally figured out is that instead for coloring from light to dark as I normally do, blending worked much better going from dark to light.

The cool thing that happened was that the grass looked like grass without having to work at it, unless someone critiques it close up.


The background of the image really matches the color of the pattern paper, though it is hard to see here. No blending required for this :o) Usually I outline the image but here I did the opposite by just leaving the edges around the image alone. What do you think about doing it this way? I seem to be going back and forth between liking it and not quite sure.
I'm so glad to get back to blogging! I hope this post was not to long for you, lol

HUGS, Sandy O

Thursday, July 7, 2011

Finally Got To The Craft Room

Phew...I was finally able to make a card this morning. It is actually the first card in a while that came out exactly the way I pictured it.

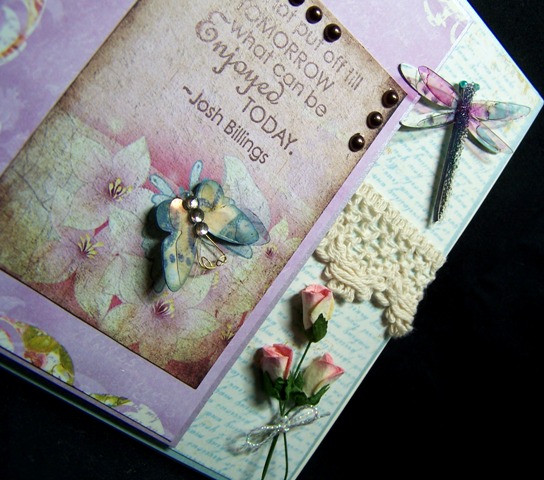
I don't know where the paper came from...sooooo nice to have paper match up so quickly. The main layer is actually an image from Nicecrane Designs called Distressed Spring. I stamped the sentiment from one of my Stampin' Up sets. The butterfly and dragonfly I got from Penny's Etsy store where she sells handmade butterflies, dragonflies and flowers. I think they are so pretty and quite a bit different from the ones I made. They went so perfectly here.

See those wonderful tulips. They are from Pizzazz Aplenty. She has some really small ones too, which I am excited to use on some of my eggs. I also used her cord to tie you tulips and chocolate pearls.

Here is the whole card front. This was such a quick card to made since there was not coloring to do. I have some more of her images that I will be working on later today.
This is the first time I used this nestie label. I have had it for a while, but just never seemed to have a card to use them on. The Stampin' Up sentiment fit perfect.

What a wonderful morning in the craft room :o) I really needed a project to just fall together to encourage my mojo. Don't you just love when that happens :o) !!!

HUGS,

Saturday, June 4, 2011

Quick and Simple Notecards

A few weeks ago, my Pastors wife asked me to make some note cards for a missionary wife that was going to visit the church. She showed me some home made cards that she recieved once when visiting a church. She loved the idea of home made note cards to send out. She only had one left though, so I decided to make her some.

First I made the folder using Paper Temptress White Gold card stock. You can see the beautiful shimmer of this paper in the photos of the note cards since it is used on every card. I used a template called All Boxed Up which was designed by Laruen Meader and is available at Papertrey Ink.

I have used this template several times with not trouble at all, but for some reason it printed all weird this time. The pockets were way to big and the folder is super tall. After altering the pockets and folder for everything to fit together, I embosses each pocket and the outside of the folder in silver.

I did adhere the pockets backward on purpose. I like the way it looks this way better, especially since I can stamp a nice image onto them this way.

I made 2 of each of these note cards for the folder.

This butterfly stamp is from Kitchen Sink and I love it. I cut it out and adhered it with dimensionals.

I made the whole set in no time yesterday afternoon, including working to fix the folder template. They go so fast expecially since there is no decorating of the insides.

I hope you all have a super weekend!
Hugs,

Friday, June 3, 2011

Dressing Up The Refrigerator

Not that I don't have enough magnets on my refrigerator, lol.  My husband likes to collect magnets from everywhere we visit. I just don't think they are very pretty, nor are they strong enough to hold more than one paper, if that. So...I decided to make some that are prettier and much stronger.

I used the retired Stampin' Up set called Stipple Flowers which is a set of 8. Using Staz On ink made them really easy to color without smudging. To color I used my much neglected Prisma pencils and gamasol to blend just a bit. The gamasol did not blend the shadowing on the flowers and leaves well. It did however blend the background colors to make them much smoother. After coloring, I coated the front and sides with 2 layers of Mod Podge glossy.

The tiles are about 2 x 2" and were bought as a 1 sq foot tile. They are so easy to remove from the tile backing so that there are plenty of this size to work with. The tiles are about 3/8" thick. They are nice and heavy, but using strong magnets, will not fall off whatever you put them on, even when holding up paper.
The magnets I used  are super duper strong. This one magnet will hold up to 5 sheets of paper or 3 sheets of thick paper, such at tickets to plays (which is what I am using one for right now). 

The kids (well, all in their 20's) bought my husband 2 tickets to see Fiddler On The Roof for his birthday. Funny, he is not artistic at all. Can't clap to music or even get the simplest of poems. yet, he loves musicals, especially this one. One of these magnets hold so well, there is no chance of misplacing the tickets or that they will fall off and blow under the refrigerator, lol

Anyway....I adhered them with a small dot of E6000 which is the duck tape of glues, lol. It adheres anything to anything, but is really to thick for using on paper. I love this stuff. It is definitely a must have for every craft room :o)
I buy these MagCraft magnets from Amazon here. Like I said, they are super strong and are relatively inexpensive compared to any other magnets I have seen. This particular size came in a package of 24 for $10.39, that is only .44 each!!! I think the price has actually gone up since I bought these. They are 1/2 x 1/16 ", the perfect size for this size mini tile.

If you haven't tried stamping and coloring on tumble tiles yet, go ahead and give it a try. It is SUPER EASY! You can by 4 x 4" tiles at Home Depot or Lowes. I made my daugher coasters for her first apartment with these, which you can see here, on my old blog. I also made some using napkins instead of stamping here, again on my old blog.

Have a great day! Hugs,

Wednesday, May 25, 2011

Stitched Butterfly With Roses

Well, today (which is Tuesday as I write this) here in NH is another rainy day. After last week being rainy everyday :o(  I think the gardens are well watered and I am also, lol. Monday, the day I made this card, was another rainy day. I did not feel like doing anything, even play in my craft room.

But I forced myself, tee he he and this is the card I came up with.

I am not sure what I was thinking since I was just not in the mood at all, but I chose to do not only stitching, but coloring too.
I used DMC floss for the butterfly and DMC metallic floss for the antenna and flown path then added some Stampin' Up rhinestones. I chalked the background and adhered both layers with dimensionals.
This rose image is one of my all time favorites from Stampin' Up, which is long retired (So thankful for Ebay). It is called Stipple Rose. The stipple line has a few flowers including orchid, gardenia, hydrangea and a set of 8 smaller flowers. I own these 5 and am not sure if there are more, but if there are, I hope I find them some day. They are so easy to color. Especially on this Paper Temptress shimmer paper. The copic ink does not dry very fast giving you plenty of time for blending.
I finally found this Tonic Studios butterfly punch which I bought from Amazon. I have been seeing this butterfly everywhere and wanted it so badly. Since I just got it in, I simply had to use it, lol
On the inside I paper pierced the butterfly. It looks so pretty stitched or just paper pierced. I bought this pattern from Crafts U Print. They have just about everything one could want for paper crafts including digi stamps, iris folding patterns, teabag folding, paper piercing, printable 3D images, card fronts, templates and more! WOW, I love that site.
Well, I have a full day of freedom to play in my craft room and, being rainy again today I don't really feel like playing. I can't even think of what to do! Wonder what I will come up with. I think I may make some CAS cards today. They go so fast and it feels like I accomplished so much, lol

I am going to enter this card into the following challenges:
Daring Cardmakers: Song: Chasing Cars-Snow Patrol The lyrics can be found here
Terrifically Thrilling Thursday: Show us what you got: anything goes
Crafty Catz: Anything goes
Inspire Me Friday: Anything goes
Sweet Stampin': In the garden &/or sketch (must use stamp)
Dream Valley: Something old with something new
I Did It Creations: anything goes
Stamp & Fun =Creativity: Flower power
Woodware USA: Anything goes

Have a super day yourself :o)

Hugs,

Friday, May 20, 2011

Daydreaming

Here is another image from Inky Impressions. I love the images that are sitting, but am not fond of the Magnolia stamps. I am so glad that others are starting to make images sitting. This one is called Angelica's Daydream.

I pictured her daydreaming about butterflies in a nice quiet garden. I think this butterfly kind of gets lost in the flowers a little bit, but I just had to add it because it is so pretty and I wanted 3 of them on the front. You know, the uneven numbers rule, lol
I am not sure if you can tell, but I adhered the circle layers and image with dimensionals. I did not want the image to get lost among the dimension of the flowers. So glad I colored her a bit brighter to help out with this.
The paper and flowers are from Prima. I am not sure where I purchased these butterflies. I wish I could remember because I am almost out of them and they are so very pretty.

I used the Inky Impressions Challenge sketch for this card. As you know, I don't usually do sketches. I think this is the first time. I always thought I should since it would be easier than designing a card myself. BUT....I found this quite hard to do. After it was finished I was glad I tried it.
I am going to enter this into the following challenges:
Inky Impressions: Sketch
CCEE: Flowers
Craft Us Crazy: Something new and favorite embellie ( I just got this image in the mail within the past 2 weeks and flowers are my favorite embellie as well as butterflies)
Landscaping Challenge: Polka dots (no more than 3 other challenges)
Have a super weekend everyone!
Hugs,

Thursday, May 19, 2011

Spring! With Shy Little Nickie

Yeah for spring! Although it has been rainy here all week, I am excited to see what the gardens, trees and hanging plants are going to look like once the sun comes out Saturday.

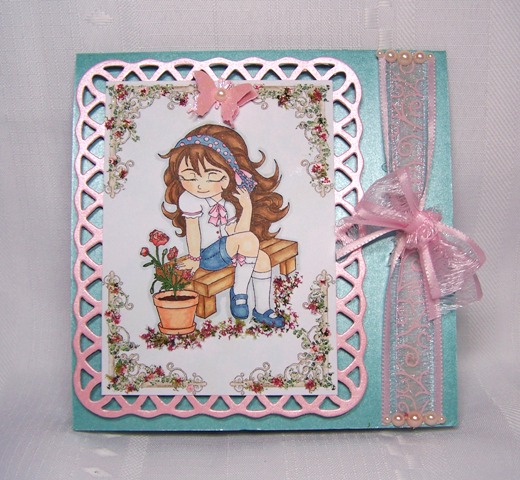
I decided that it would be fun to make a sunny spring like card as I wait. I used the super fun and adorable cling cushion stamp from Inky Impressions called Shy Little Nickie. This is one of the few site (well, actually, the only one) that I have been purchasing rubber stamps from lately. I just love their images. This is actually the first chance I have had to use one and it was so much fun to color.

I also finally purchased some flower soft. I found that they have instant downloads for backgrounds to use with it. The frame I used here is one of them. Isn't this just the perfect image to stamp in it!
This was my last sheet of the turquoise shimmer paper. What a great color, which, ended up matching everything else so well. After I made the card and went to put my stamp on the back, I realized that there was a butterfly stamped on the bottom of the sheet. Oh My Gosh!!! What was I thinking when I did that!!! To rectify this, I made a strip with a border punch to cover it up.

I am loving this new to me frame from Spellbinders. I do wish, though, that it came with a few more sizes. Then next size down is really to small for most images to be put inside. The butterflies were punched with a Martha Stewart punch. I find her border punches do not punch card stock and was pleasantly surprised that this punch worked well. The paper I used was a scrap that I happened to emboss with the wrong embossing powder at one point. It was still kind of pretty, so I kept it in case I could ever use it. So glad I did.
We finally worked out the computer problem, but sadly had to wipe the hard drive first and bring it back to factory condition. We needed to reistall all the software and are still working on getting everything back to where it was before the problem. Though we backed up everything onto 2 external hard drives, it seems that all my favorites from when we bought this computer are the only ones that we can find :o) They have changed so much. Half of the book marked sites are either gone or I no longer visit. New ones are not there. So I don't have all the saved blogs I visit most often. Funny how much I relied on the book marks. Now I don't know most of them, since I would just hit the book mark and did not remember most of the blog names.

Soooo...If I do not visit your blog as I usually did, please leave me a comment so I can book mark you again :o)

I am entering this card into the following challenges:
Anything Goes Challenge: Bingo...I went diagnonal to use punches/die cuts, flowers and lace/ribbon
A Spoonful Of Sugar: Anything goes
Clear It Out: Use not used in a long time coloring medium (I used some copic colors I don't usually use, Like for the pot, I hope that counts)
Paper Take Weekly: Something floral
Cupcake Crafts: In the garden
Make It Monday: Anything goes
Stamp Fairy: Use 3 embellishments (ribbon, pearls, flower soft)
Creative Belli: Anything that starts with an "S" (I hope the stamp name counts! and swirl ribbon)
Creative Card Crew: Cute and girly
Diva's By Design: For the girls
Flutterby Wednesday: Open...optional sketch, must have either a butterfly, fairy or angel
Penny's Paper Crafty: Anything goes
Truly Scrumptious: Anything goes

Hugs,

Friday, May 13, 2011

Note Card Set

I was asked to make a note card set for the pastors wife that will be speaking at my church's mother daughter banquet at the end of the month. We are giving her a nice thank you basket filled with lots of goodies.

I decided to use a note card folder I purchased quite a while ago from Papertrey Ink and designed my Lauren Meader . It is a great folder which I have used a few times already.

For the butterflies on the folder I used a new to me set from Kitchen Sink Stamps. The paper is the beautiful white diamond from Paper Temptress that I use quite often. I did not take a photo of the shimmer since there are quite a few photos already for this post, lol

I adhered the inside pockets backward on purpose since the folds to make it look like an envelope were not even for some reason. I think it was my printer having a hard time with the card stock. I punched the half circles to help remove the cards and envelopes easily. I actually like the pockets better this way. I did notice while editing the photos that I should have stamped the butterflies the other way, lol.
 
I made 2 of each card to include in the set. In this group picture you can see the pretty shimmer of the white diamond used for the folder, which I also used on the 2nd from the right card. All of the cards were made with colored shimmer card stock and the paper truly makes the folder and set look stunning.

Since these are note cards, I left then inside blank for lots of writing room. The paper really makes it look pretty anyway, lol Here are some photos of the individual cards.


I had a hard time making these so that they will not cost extra postage. Embellishing without pearls, rhinestones, flowers, bows, and all that fun stuff is not easy, lol I hope she likes them.

I am entering this into the following challenges:
Daring Cardmakers: the darling "bugs" of May (desinger paper does not count), I chose butterflies
Creative Cowgirls: anything goes
Scrappy Frogs: anything goes
Crazy Challenge: anything goes
Make It Monday: anything goes

Hugs,