Sunday, October 10, 2010

New blog Candy Winner

Hi Everyone...the blog candy winner has not gotten back to me after 9 days so I decided to draw another winner.

True Random Number Generator
Min: 1
Max: 94
Result:
32
Powered by RANDOM.ORG

I wish I knew how to copy the box, when copying and pasting, this is all I get...but

Genelle Voss is the lucky winner. Genelle, email me with your information and I will get you candy out this week.

paulssandy@papertransformer.com

Congratualations!

hugs, Sandy O

Saturday, October 9, 2010

Inchies Perfect Flowers

Finding items for making a pretty inchie can be difficult, especially flowers. I have taken up making tiny, tiny, itty, bitty flowers, mostly for egg making. These tiny flowers, though, are the perfect embellishment for an inchie.


As you can see by the dime next to them, they are TINY. These are the first dogwoods I have made. I also made some lily of the valley, which you can see on my blog post here.

These flowers are made from paper that has been punched out with punches made specially for creating flowers this size. To adhere them to the stem, 2 glues are used. First, holding the petal or leaf with tweezers, the tip is inserted in some tacky glue. Right after, it is inserted in some super glue and quickly attached to the stem. The super glue causes them to adhere instantly. I am really not sure why only super glue is used, lol, but they are always made with the 2 glues.


Aren't they cute! I made 11 so far and have a few more to make. I will be making many of these, as well as many others between now and next October. The plan is to get a table at next years Egg Art Show and sell them to those attending the show.


I could not help but notice that they would make a lovely inchie. I decided to use an old pre-cut chip board square and cover it with some of the lovely and shimmery Paper Temptress paper.

Now, I will confess to you that this is not a true inchie since it measures 1 1/4" square instead of 1" square. I did not have a pre-cut 1" to use, so thought this would be close enough, lol.

I had such a difficult time tying this knot! Four leaves ended up falling off and I had to reglue one petal. Other than that, this inchie was super fast to make.

I am sure that you could purchase some small punches at your local craft store to make some of your own.


I am entering this into the following challenges:
Cute Card Thursday: Make your won embellishment
For Fun: Something you never used before
No Time To Stamp: Back to nature, any season
Stamp Something: Something punchy. use a punch
Tuesday Throwdown: Chipboard

Have a super weekend!!!

Hugs,

Friday, October 8, 2010

Celebrate Everything Everyday

There are so many things to celebrate today, such as health, family and a wonderful life in general. Among these many blessings, there is one other thing to celebrate today. Wink Wink Ink is hosting the "Other Things" challenge over at CDAC (Crafters Digital Art Center). The link HERE will take you directly to the challenge.

The challenge is:
Let's have some yummy fun!! Use food themed images, embellish with your favorite eye candy, do whatever it takes to make your card a feast for the eyes!!

The challenge is going on until October 20th.

The winner will receive a Free digi from WWI. You can check them out here. The are sooooo adorable!


Not only is this a scrumptious challenge, but Melanie is offering a freebie "set" for you to use if you desire. There are 5 freebie images you can download  from any of the challenges WWI has hosted on CDAC which you can find in the discussion center here.  This particular set can be found here along with the challenge. One of these 5 sets must be used for the challenge.

To download the set, all you need to do is click on it...when the new window opens, just right click...save as and save in your Wink Wink Ink file. If you do not have a file full of WWI images yet, now is a great time to start a folder to fill {{{wink}}}

I used the set to make a delicious card that can be used for many occasions, because every day offers something to celebrate!


For this card I used 4 images from the set...cupcake, rose, candle, sentiment stick (not sure what the real name of it is, lol}. A tent card seemed to be perfect for the images :o)


I will be watching the challenge as I am excited to see what creations are made with this or the other adorable images that WWI is offering for free!

Enjoy! And don't forget that everyday has something to celebrate (with a cupcake, of course, lol!!!)

Hugs,

Tuesday, October 5, 2010

One Set, One Design, 3 Ways and a Tip for you

Wink Wink Ink posted their monthly challenge (this is challenge #4) on CDAC (Crafters Digital Art Center) last Monday. The challenge: BUTTONS. You are to use any kind or size button you would like, as long as there is at least one on your project. How nice and simple is that!


>>>The winner will receive a $10.00 Gift Certificate to the Wink Wink Ink store!!!<<<

Today I want to share with you WWI's brand new set Holiday Peace. I used the same stamp set and the same design for each of 3 cards. I was pleasantly surprised how different the look of the digital image and completed card was by changing/adding just a couple of things. The 3rd one below is the card I made for Challenge #4.

CARD 1
For the first card I simply printed out the pre-colored card front. I searched high and low for matching pattern paper and could not find one! YIKES!! So I did what any good crafter would do, I searched through our Christmas wrapping paper and found a perfect match!

I covered the complete card front with the wrapping paper. I ran my Krylon gold marker around the edges of each layer, adhered with dimensionals and finished off with a bow.

For the inside, using Photo Shop Elements, I changed the opacity of the cat/mouse silhouette to around 20%. I also changed the color of the sentiment using the paint bucket tool. Again running the Krylon marker over the edges and adhered.
CARD 2
For the second card, I wanted it to be just as quick and easy but with a pretty shimmer. I used the Paper Temptress Canvas Luster paper to print the image onto, some colored Vintage Luster paper for layers and White Diamond paper for a base.
 I love how the different paper caused the colors to be muted a bit, printing out is soft pastels.

CARD 3:
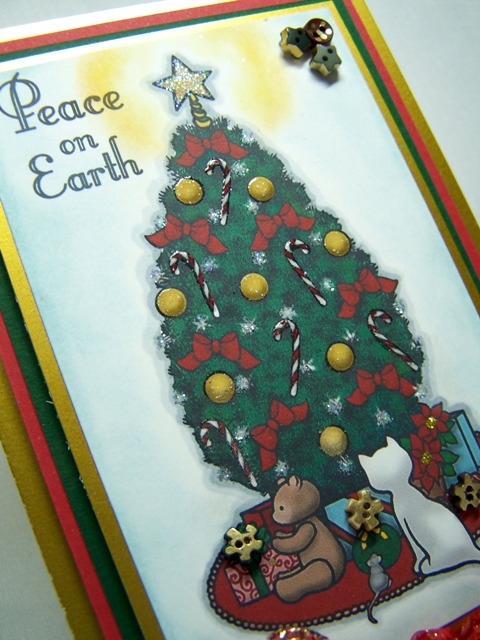
For the 3rds card, I deleted the background color of the card front image, leaving it white but the image intact.

TIP:  Try using a firm, flat paint brush to apply your chalks. The one I used for this background is 1/4". What I found is that a paint brush as opposed to other mediums I have tried, such as sponges, daubers and cotton balls:
1. Gives much better control in how light or dark the color is applied
2. Does not apply splotchy but keeps the colors even
3. Gives much better control of where the color is applied. The light around the tree topper is a good example.
4. Gives a much better blending of colors. You can see how the background gets darker as it gets closer to the edges and below the tree, yet there is a nice, gradual blend.
5. Best of all, the paint brush cleans off with just a wipe or 2 on paper and can be used indefinitely, saving money!

I then embossed the candy canes and ornaments with clear powder and added glitter to the tree lights and topper. To finish it off I added some tiny buttons, which I colored with the Krylon marker, to the corner and gift bows. Below you can see that I also added some star buttons, with the back loop cut off, to the inside of the card.

Here you can see the 3 card fronts:


Isn't it amazing the difference a few small changes make!

I am entering this into the following challenge:
Top Tip Tuesday Challenge #5

I can hardly wait to see all your "button" creations through out the month...have fun with it!

Hugs,

Fun, Fun, Fun Challenge Today

This week Digital Tuesday Challenge has one of the challenges I love to do, Ribbons, Buttons and/or Bling!


We also have the most wonderful sponcer for you this week. Fred She Said is offer the winner a $20.00 Gift Certificate to her store!!! Whoo Hoo...

We were lucky enough to be able to play with an image of our choice. I chose to use the "Sunflower & Thankfulness Pre-Colored" Images.

With the set you get all the layers needed to make a dimensional card. Just cut, embellish and adhere.

For the center of the sunflower I used Tim Holtz distressing embossing powder. It is hard to tell by the photo, but it gives the perfect "bumpy" embossed look. To snaz up the flowers I added Dazzling Diamonds with my glue pen. I go through those pens so quickly as they can be used for just about anything one would need glue for.

Here is a close up of the scripture verse that comes with it. You can also add your own sentiment if you desire since there are 2, one with the scripture and one blank. I added Dazzling Diamonds around the frames also (bling, bling, I love bling, ha ha ha)

I used the blank one for the inside of the card, leaving it as a single layer with no glitter or embossing. The flower on the left is 2 layers.

For the card base I used the beautiful White Diamond paper from Paper Temptress. If you would like to see what makes this such a beautiful paper, the photo of the inside will give you a glimse of the shimmer it has (just click on the photo for a better look). Of course, a photo can never to justice to it as the shimmer reflects the light so wonderfully a good shot of it is really, really difficult to get.
This stunning ribbon is also from Paper Temptress. Patricia has all her ribbon on clearence for 40% off. I have been stocking up on most of it. I am not sure what I am going to do when I run out. It is the prettiest ribbon I have seen.

I am entering this card in the following challenges:
A Spoonful of Sugar: Sparkle and Shine
Fab'n Funky Challenge: Use a digi stamp
Ginger Loft: All that glitters or blings
Stamp, Scrap & Doodle: Open...but use a digi
Stampin' Sisters in Christ Challenge: Anything pertaining to nature
Stamptacular Sunday: Layer it on


Well, now my craft room is covered with embossing powder, glitter, tiny pieces of paper, a stack of paper that needs filing, a pile of print outs and templates needing filing, egg art stuff I bought that needs a place to rest....Soooooo, my plan today is to brush off my desk and work around it all, ha ha ha.

Have a wonderful day yourself. I really hope you join us this week at Digital Tuesday Challenge. I would love to see what you create with these super fun embellishments!

HUGS,